Monday, May 23, 2016

None, none, none, none, none, none, none and none.

Okay, I'm a bit overdue with this post.  I promised back in February I'd give an update on the Gates belt after 1,000 miles of use.  Well I passed that mark some time ago ... here's the update, albeit late.

I duly report, that I have nothing to duly report.  Not. A. Thing.  Nothing, nil, nada, zilch, squat!

Problems:  None
Adjustments:  None
Maintenance: None
Lubrication: None
Noise: None
Greasy Pant Legs: None
Cleanings: None
Visible Wear:  None

The belt has replaced the most tended part on my bike, the chain, with one of the least tended parts.  I don't even think about it (much) ... you know ... like not thinking to post an update.  Admittedly, its not as far in the back of my mind as the little nuts on the valve stems, but its close.  And yes, bike snobs, I still use those little valve stem nuts.


Thursday, April 21, 2016

Flatless or Flat Less?

I had a total of three flats on my Wolverine's Schwalbe Supreme tires in the first 1,000 miles.  Changing tires and patching tubes is just part of bicycle life and every 300-350 miles is quite tolerable.  I was happy and really liked the tires.

Without scientific evidence to support this claim, it appears goathead thorns become much more prevalent in the late summer/fall here ... to the tune of about 15 flats in the next 800 miles (all thorn caused!). I started getting punctures in my patches, literally, and all these flats started sucking the fun out of riding.  

The next 1800 miles yielded exactly zero flats, because I switched to Schwalbe's Marathon Plus line.  The ride difference was negligible, at least by the way I ride, and zero beats the crap out of eighteen, but there's a down side.  The Marathons have a wire bead and are a pain in the sphincter to mount.  I pinched three tubes with the tire levers before getting them on.  But, hey, they're "flatless" according to Schwalbe's website, so I'd never have to do it again!  Who believes that?  

Two weeks ago, I hit a sizable piece of crushed rock that flattened my flatless rear tire, and changing it was as frustrating as it was the first time.  At least they go flat ... less.  Two days ago, I get a second flat, though oddly the tube wasn't punctured ... maybe someone let the air out, who knows.  Of course I didn't realize this until after removing the tire from the rim.  At this point, I considered switching back to the Supremes, for fear I wouldn't be able to remount a tire out on the road.  Then I found this video:


I feel like I'm the last one to learn these tips, but the video helped me get the tire mounted without levers ... as in hands only.  Thanks random guy in red shirt with cool accent.  Perhaps posting this passes on the secret to someone else as clueless as me.

Monday, February 29, 2016

Third Time's [NOT] A Charm

Still loving the belt drive, but something weird has happened, not just once or twice, but three times in a fairly short period of time.  Its also something that never once happened with the chain.

When stopped at an intersection, I usually back spin the right pedal into position for an impending take off.  The belt, with its relatively prominent teeth, like to grab things and pull them up into sprocket.  Twice those things were shoe laces, once a pant leg.


The shoes I often wear have rather long laces so a triple knot takes up all the extra lace (almost all).  Despite being short, the loose ends can lay nicely in the belt teeth and ride their way into the cog.  The one day I didn't wear a strap around my right pant leg proved the belt isn't bias toward shoe laces.

BTW, getting the snag undone seemed more frustrating than getting a pant leg caught will pedaling forward.  You can't just back pedal to get loose, as backpedaling pulls the lace/pant leg farther into the sprocket. One must lift the rear wheel and pedal forward, similar to stopping in the wrong gear on a derailleur bike ... except the right leg is right in the pedal's immediate path.  So, its more like standing on one foot, lifting the rear wheel and pedaling forward.  I think I'll just tuck my laces from now on.

Wednesday, February 24, 2016

Belt Assessment - Initial Impression

I've pedaled a whopping 103 miles since completing the belt conversion.  After such a short period, opinion beyond an initial assessment would be disingenuous at best, but I am already loving me some Gates Carbon Drive belt drive.  Glass smooth, graveyard quite, and Clorox clean. It looks awesome too, for those who value aesthetics.  Of course, once the shine wears off a bit, will it remain as smooth and as quiet and as pretty?  Also, will it prove itself as durable and low maintenance as claimed?  Time will tell and I will revisit my assessment at various times, hopefully after 1,000+ miles and again several thousand miles after that.

For now, my pant legs love me again, as do my chainstays, cranks and everything else subjected to the chain lube gunk-zone.  That beautiful Pumpkin Orange color shines again after removing all that black splatter, and hopefully will remain so ... given my intense dislike for cleaning.  My pre-ride activities now include a push on the belt, similar to squeezing the tires.

As for ride quality, there's little to no difference except the chain made some noise before it was removed (needed lubing badly).  In general, I was pretty happy with the chain, sans the maintenance and gunk, so no discernible difference is a good thing.  The 50/20 gear ratio is slightly higher than the 38/16 it replaced, but even that isn't readily noticeable.  We're talking only a few gear inch difference in most gears.  It added about one gear inch at the lowest gear and about five on the top end.  The range now stands at 18.8 to 99.0.

It's easy to imagine extra tension from the belt wearing out the bottom bracket bearings faster.  How much faster, if at all?  I won't be able to tell as I don't have a baseline reference.  The original Shimano BB-93 still performs as new.  When it does finally decide to call it quits, I won't know how much the chain or the belt contributed to its demise.  I purposely bought another BB-93 for when a change comes due.  I could then compare its life to the current one and extrapolate an answer, but that will be two bottom bracket failures away.

The very day after completing the belt conversion, I got a bit of confirmation on my Rohloff/belt decision. While leaving work, I intersected with another cyclist who decided to kick it in the ass up a gentle incline right in front of me.  I watched him as he stood up on the pedals ... then, CRUNCH.  His chain had jumped teeth so badly the chain came off and wedged in his cranks.  After witnessing his impression of a Chinese acrobat in fast forward, I mentally kissed my Rohloff and shiny new Gates belt ... then stopped to assist.   Actual photo ...


Monday, February 15, 2016

Belt Conversion - Belt Install

This blog post is the 4th of 4 Belt Conversion posts. Here are links to the other three:

Rear Cog Removal
Rear Cog Install
Front Sprocket

I have to admit, I approached splitting the frame with the same irrational fear a toddler might have as he gets his first haircut.  The first time you start mucking around a frame's integrity (or one's head) a certain amount of caution is in order.  The fear, as stated, was irrational ... its easy peasy.

The split on my frame (Version #1) is at the dropout.  The chain stay and seat stay fit like a glove and are squished together between the dropout and the dropout bolts.  Simply remove the two dropout bolts completely and the dropout falls free on the wheel side of the frame.  The frame can then be easily spread enough to get the belt through.  None of the documentation said anything about belt direction, so I assume it can go on either way.  I inserted the belt so the print on the belt itself read correctly once installed.

I won't go through all the do's and don'ts of belt handling.  If you've purchases the belt, cog, sprocket and carrier, you will have at least four documents explaining this.

Reinstall the dropout and slide it all the way forward (the belt's loosest position).  Slide the brake-side dropout all the way forward as well.  Now its time to install the wheel.  With the belt around the front sprocket, insert the wheel and push it forward so the belt can be slipped around the rear cog as well.  With the belt lodged in the teeth of both sprockets, pull the wheel back and into the dropouts, just as with a chain.  the belt will be quite loose.  The pic below shows loosened dropout bolts and the adjusters backed all the way out so the dropouts could slide all the way forward.


With the dropout bolts still loose, tension the belt by turning the two dropout adjusters equally until the belt reaches a tension of 28-40 lbs.  You will need a Gates belt tension tool to do this and should take several readings each time you measure tension as the results vary a bit from reading to reading.  The tool is easy to use and comes with simple and adequate instructions.

Once the correct belt tension is reached, tighten the dropout bolts.  Since maintaining belt tension is vital, reap on the dropout bolts pretty hard to ensure they don't loosen.  Bolts coming loose is a common argument against sliding dropouts.  I hadn't previously had any issues, but two of the bolts were a bit loose when I started this conversion, so they can get loose.  By the way "reap on the bolts pretty hard" is a perfectly acceptable mechanic's phrase ... at least in my garage.  Lastly, tighten the adjuster nuts so the adjusters stay as set.  Conversion complete.


I used a 50 tooth CDX sprocket, 20 tooth CDX cog and a 115 tooth CDX belt, info on which can be found on the Gates Crabon Drive webpage.  At the bottom of that page there's a link to a "Drive Calculator" (first image below) to help find sprocket/belt combinations that will work.  The Wolverine's chain stays can adjust, via the sliding dropouts, from 425mm to about 445mm on all frame sizes, so select from the results that fall in that range and have the gear ratio you want.  I use Sheldon Brown's Gear Calc Tool (second image below) to help with choosing a gear ratio.


Belt Conversion - Front Sprocket


This blog post is the 3rd of 4 Belt Conversion posts. Here are links to the two previous posts:

Rear Cog Removal
Rear Cog Install

Replacing the front sprocket was suppose to be the easy part.  A simple plan to remove the four chainring bolts, swap the sprockets, and reinstall the bolts.  Yes, a simple plan, indeed.  I suspect every train wreck in the history of train wrecks started with a simple plan to go from point A to point B.  Here's how my train wreck sprocket replacement went:

There's no need to remove the crank or even the pedal, as the sprocket will slide right over them.  The original chainring came off as expected ... then the derailing happened.  The tabs on the Gates sprocket didn't line up with the cutouts on the Middleburn spider ... they were too long ... it wouldn't install.  I bolted the original sprocket to the gates sprocket to show the difference.


You might have to click on the image to expand it enough to see how the Gates sprocket extends farther at each of the bolt locations.  It seems this crap should be standardized, but its obviously not.  Not sure if it was Middleburn or Gates that screwed the pooch, but I'm definitely the pooch in this analogy.

I had already filed on my expensive Rohloff hub, and I have to admit the pucker factor was pretty high.  Now, I have to either file the Middleburn spider or the Gates sprocket about 1/16th of an inch at each contact point.  I ended up filing both ... starting with the spider but found the sprocket was easier to grip and get good strokes with the file.  I hope I didn't bend the sprocket in the process.

Its done, but removing metal from components that are supposed to fit isn't fun.

Belt Conversion - Rear Cog Install

This blog post is the 2rd of 4 Belt Conversion posts. Here is the link to part one:

Rear Cog Removal

The Rohloff-Gates carrier only goes on one logical way, with the threads for the sprocket pointing out.  A liberal mount of waterproof grease applied to the threads of both the hub and the carrier, and the carrier screwed on easily.  I did find it convenient to leave the cog removal tool (from when I removed the original cog) in place.  This helped guide carrier and avoid cross-threading.

The cog's positioning wasn't quite so simple, as it  would screw on either way without being obvious as to which way was right.  It also isn't symmetrical, as one side has a lip, so there is a right way.  Wanting to install it correctly, I broke down and actually read the instructions that came from Gates.  Imagine that.  It didn't help at all.  The entire instruction sheet talked about proper belt handling.

So, I guessed. The cog only screwed on about two threads and stopped..  It didn't seem right ... that and the fact any time there's a 50-50 shot at anything, I guess wrong 83% of the time.  So, I guessed again.  Bingo, the cog screwed on farther and came flush with the edge of the carrier.  Lip side out ... again with plenty of water proof grease on all the threads.

Here's a pic ... note: the carrier is black and the sprocket silver.


Belt Conversion - Rear Cog Removal

This is the first of four blog posts describing my belt conversion.

Getting the bleeping rear cog off.  Here's what I did ...

1.  Clean the hub of as much gunk as possible before starting.  I used dish soap, water and a rag ... but degreaser would have worked better.  A wooden toothpick works well for cleaning the slots where the prongs of the removal tool insert.

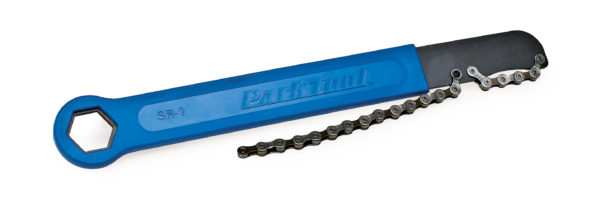
2.  Fasten the cog removal tool using a skewer.  Make sure the tool inserts all the way into the slots (see picture).  I chose to remove the skewer springs and attach it with the nut end of the skewer on the drive side.  Including the springs might have been a better choice, as the skewer didn't remove as easily as it should have.


3.  Attach the chain whip making sure as many links of the chain are engaged as possible.  I used a large crescent wrench on the removal tool.  At this point its all about leverage  Despite me muttering "design flaw" several times, If you get enough leverage on the wrench and chain whip, in opposite directions, the cog will loosen.  You won't believe it until it does, however.

Getting the necessary leverage ...

I had talked on the phone to a reader of this blog named Mark.  Mark employs a two man operation using a hammer to remove the rear cog from a Rohloff hub.  He didn't go into details, but I envisioned one person operating the wrench connected to the hub tool and another on the chain whip end.  Not sure which side he hammered but I assume the chain whip side.

My first attempt mimicked Mark's method.  With wife
bearing down on the crescent wrench, I wailed away on the chain whip handle with a large hammer.  I continued hitting about six times beyond when the wife started complaining ... sorry dear.  Fail number one.  I needed more leverage.

Attempt two:  I just happened to have a 16" long piece of 1 1/4" PVC pipe in the garage, and the crescent wrench handle just happened to barely fit inside the pipe.  I was a bit concerned about the strength of the pipe, but the garage didn't yield any other options, so I went with it.  Some sound advice:  Never clean the garage.

Now, with the wife leaning all her weight (she's 5'2" by the way) on the PVC and me countering that weight on the chain whip end, the cog loosened with a gentle bounce of weight on my end.  It seemed quite easy once we had enough leverage.


My LBS tried getting the cog off a few weeks ago.  In a previous post, I stated concern that the mechanic had actually tried to tighten the cog.  Fear confirmed.  The slots on the hub, where the removal tool inserts, were damaged in a way indicating a tightening action.   The slots were actually broadened so much that burrs prevented the cog from coming of freely.  The cog actually cut threads into the burrs as it came off.  The burrs had to be filed down before the Rohloff-Gates carrier would spin on.  More sound advice:  Don't let any mechanic work on a Rohloff unless they are experienced with the hub.

Thursday, February 4, 2016

Lefty Loosy, Righty Tighty

I plan to install the Gates Belt components onto my Wolverine this weekend.  I hadn't had many weekends free lately, but this looks as good as any.  Its important to note, I've been waiting for a full weekend in case issues arise.  This bike is my ride to work, so it has to be up and running Monday morning at 7:00 AM.  A week night might not allow me the time needed.

I did make two attempts on two different weekends, though.  Both attempts started with trying to get the cog off the hub.  I tried one Friday night using a make-shift chain whip but failed, so the next morning I took it to the ol' reliable local bike shop.  With my Rohloff cog removal tool (pictured) already affixed to the hub, one of the mechanics took it to the back of the shop to "give it a go".  Twenty minutes later he returned with cog still attached to the hub.  He had used a vice to hold the hub, then bent two tools trying to get the cog off.  Sigh.


On the second attempt, I took the wheel with me on an out of town trip, in hopes a bike shop there could help ... but forgot the tool.  I went to a shop that sells Rohloff related items (including the tool) on their website, so there was hope they would have some experience ... nope.  The first mechanic asked three times what kind of hub it was.  He'd never even heard of a Rohloff.  The second guy let me into his shop with him.  He attached the tool and a large chain whip ... my hopes ran high.  As he readied to press the chain whip and wrench down in opposite directions I noticed he had it backward ... ready to tighten the cog!  After a brief disagreement, I finally convinced him that the cog screwed on and needed to come off like a nut.  Then I notice he had attached the wrong tool.  Deep sigh.  Went home with the stubborn cog still attached.

I now wonder if the first mechanic didn't spend 20 minutes and two bent tools tightening the hell out of my cog.  Ugh.

Bought a Park Tool SR-11 Chain whip ...  that cog comes off this weekend!